Introduction
Many Quarch modules support LAN control. When bringing a new device onto your network you should consider what setup is required to work on your network.
By default, Quarch LAN devices are setup with an IP address of 192.168.1.99 and DHCP enabled. If you do NOT have DHCP available on your network, you will have to assign static IPs first.
Before Starting
Please make sure to take note of the IP address of the module both before and after the process. This is especially important for modules that do not have a USB connection because if DHCP is not set up and the IP address is not on the same subnet a network scan might not pick it up and the module will be lost.
A factory reset of any Quarch module will reset the IP to default which is 192.168.1.99. If you have anything else on the network that uses this IP address, please go to the section: Direct Ethernet connection to a module
Communication methods
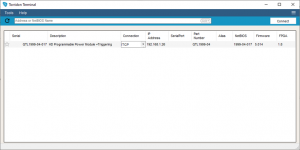
Torridon Terminal and Python Terminal can be used to communicate with Quarch modules and set a static IP. QIS can also be used for the range of power modules.
Torridon Terminal can be downloaded from the Quarch website here: https://quarch.com/file/torridon-terminal/
If you need the windows USB drivers, you can find them here:
https://quarch.com/file/torridon-driver-win8/
For cross-platform options, grab the python quarchpy package which you download using the command:
“pip install quarchpy”
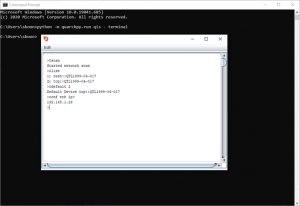
You can launch QIS with a terminal window by using the command:
“python -m quarchpy.run qis -terminal”
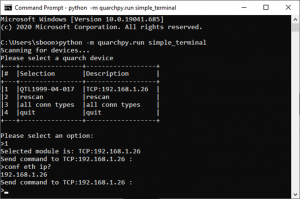
You can launch the simple terminal script using the command in quachpy 2.0.19 and later:
“python -m quarchpy.run terminal”
Setting the IP options
If you can see the module using any of the above options, simply send the command:
“config:ethernet:ip xxx.xxx.xxx.xxx”
You can query the IP address using the command:
“config:ethernet:ip?”
All commands can be found using “help” and ethernet command can be found using “help ethernet”. For a full list of commands, see the relevant Technical Manual for your product.
Enabling a static IP will automatically disable DHCP. You should make sure the static IP you assign is free to use and document the address you assign to the module so it is recorded for the future.
QTL1995 modules have 6 ethernet ports, one for each module. If your network does not support DHCP, connect one port at a time until all the IP addresses have been set correctly, otherwise there will be conflicting IPs on the network.
Depending on your network, you may also have to set the ethernet gateway, mask and DNS options:
“config:ethernet:gateway 192.168.0.1”
“config:ethernet:dns 192.168.0.2”
“config:ethernet:mask 255.255.255.0”
Direct Ethernet Connection to Module
The above may not work if:
- You already have a 192.168.1.99 address on your network
- Your local subnet is different
If USB setup is not an option and you can’t see your module on the network or you can’t talk to it, you can make a direct connection to it using ethernet.
Step 1. Use an ethernet cable to connect your PC directly to the module.
Step 2. Take Note of your PC’s current IP set up, this will be needed later to reset the PC.
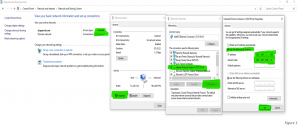
Step 3. Change your PC’s IP address to have the same network ID as the module. If the module is using its default IP address of “192.168.1.99” use “192.168.1.100” or another available IP address with the same subnet.
For windows this can be done in the Network and Sharing Centre. In the IPv4 settings, you need to set a static IP address that is in the same subnet range
Step 4. You should now be able to connect and change the IP settings as described above
Step 5. Disconnect your module from the PC and connect both PC and module to the network.
Step 6. Reset your IP address to what it was before and use the chosen connection method to test the connection to the module.

Stuart Boon